
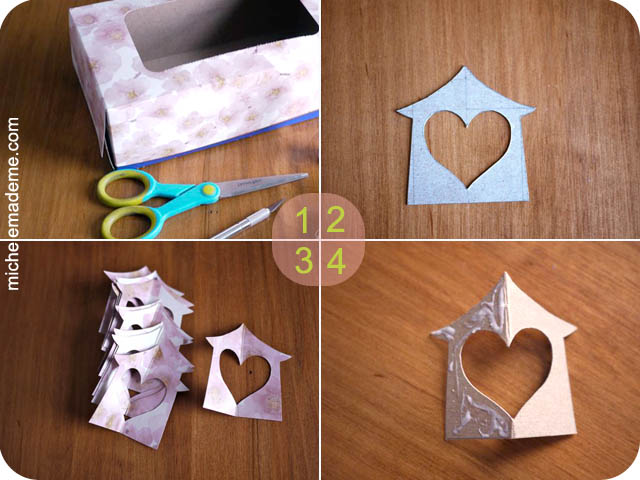
- Old greeting cards or tissue box (but I strongly recommend old greeting cards)
- Pair of scissors
- Exacto knife
- Craft glue
- Clothespins (for clamping)
- Pretty string
- Two wooden beads (I stole these from The Boy’s stash. Does that make me a bad mom?…)
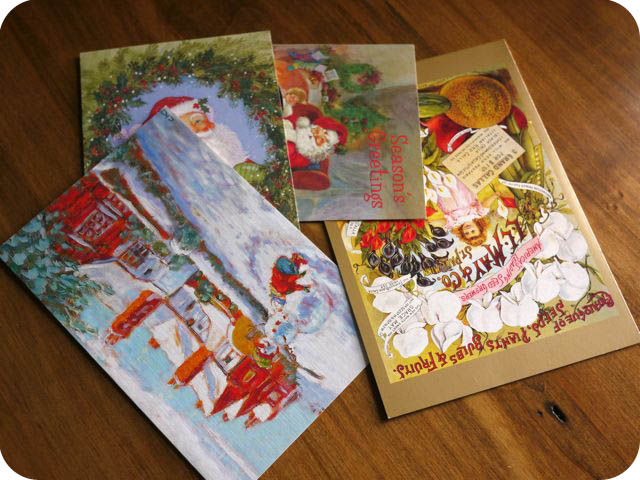
1. Start with either greeting cards or a tissue box. To give my greeting card ornament a cohesive look, I chose several muted Christmas cards of similar style and colour (as above).
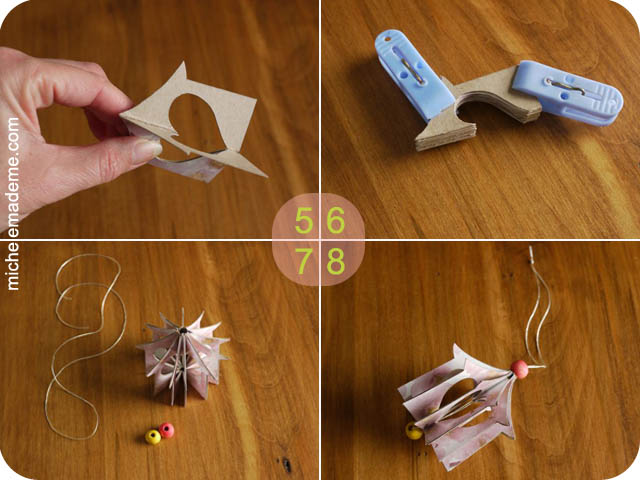
5. Take a second house and join it to the gluey house, bad sides together. Clamp this pair with a clothespin or two. Repeat steps 4 and 5 for the remaining 5 pairs of houses. You now have six pairs of half-glued houses. Now apply glue to the bad side of half a house in a pair and glue two pairs together. Continue glueing pairs together until you have 3 groups of four houses.
6. Now glue all groups of 4 together as before and clamp as shown in photo #6. Allow to dry.
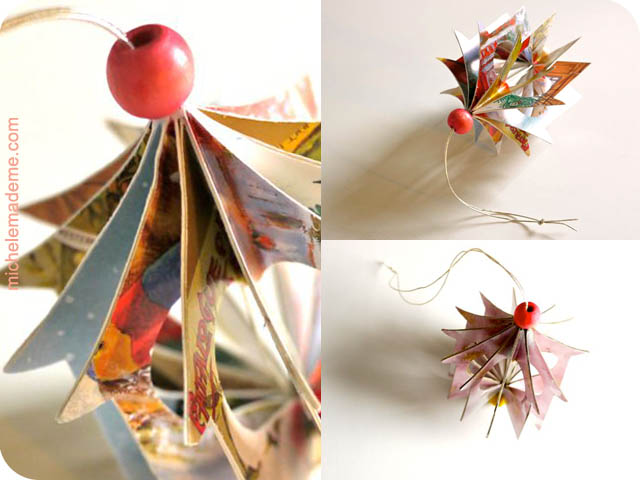
7. Glue the two end houses together to create the completed heart house. Clamp and let dry. Gather your beads and string.
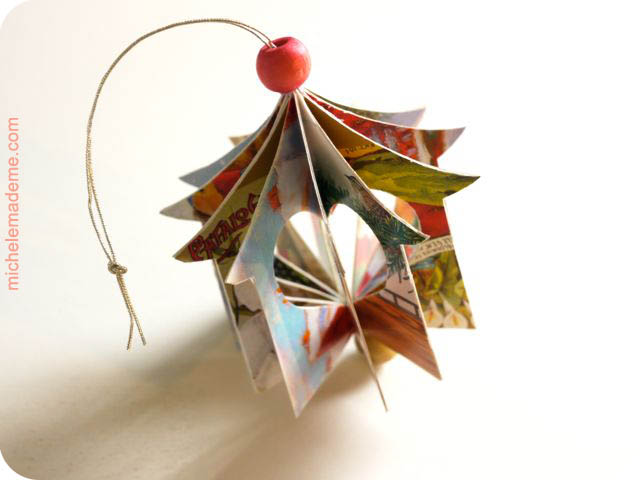
8. Place a bead on your string. Now thread both ends of your string up through the heart house. Once through the top, place a second bead on your string. Tie the ends of the string to make a hanger. Trim the string ends if necessary. Apply glue to the very peak of your house to adhere the upper bead to the house.
Thank you very much! The tutorial is great!
wow! These are beautiful! Definitely going to give this a go!
I love the way your brain works. Talk about making a silk purse from a sow's ear. Wow.
So happy you are happy! I just adore this little house. I hope to make one!
How wonderful. I love it when easy can be Beautiful. So pretty!
Your projects are simply amazing…. greetings from Capri Island (Italy)… I am one of your silent follower but I fall in love with this so it was impossible not to talk!!! (sorry for my english!) kiss Consilia
I sure hope to make one, cause these houses make me happy too!!
You are brilliant and your creations are wonderful and full of poetry! THANKS! Ciaoooo!
That is really lovely, so effective, what a good use of old Christmas cards too.
Carol xx
Excuse my while I bite my hand and gasp…one of my new favorite Michele creations! The heart, the house, the delicate intricacy, the recycled cards! LOVE.
I must admit, this is my favorite too! Well done.
Very cute and clever! And, it's great you're having a good time with it. So simple, yet wonderful, ornaments!
Mieljolie
I love this one! I have to try it! Thanks for sharing.
I just love this one and it's something I think I can actually achieve!! Thanks for another great idea Michele.
This a such a great project…pinning this for my next to do!
Just love this Michele and I just happened to have some greeting cards stashed away for that special project. Thanks for Tutorial!
love, love, love it !!
This is so beautiful! Now I have something to do with old Christmas cards other than recycle them. Thank you!
So, so pretty. It reminds me of an itsy bitsy gazebo . So glad you are feeling well!
So cute!!! Do you have a template to share??
Hi Anonymous, I don't have a template printable but a template can easily be drawn up from the instructions. Best of luck!
Hello !!!
Yes, I made a template from the instructions. So anxious to try this over the weekend. I just love your website. My template is about 4 inches tall, is that about right?
Hi again Anonymous, My house is 3-1/2 inches tall so I'd say yours'll be just great! Have fun!
I think this is awesome and certainly a great way to make good use of old cards. Thanks for the inspiration
Janice
These are very cute.
Thanks for the step by step explication!
This may well be one of my favorite things you've made – so perfect in its simplicity!
LOVE this idea and looking forward to trying it!
this ornament makes me so happy and i can't wait to make it and share with the people who make me happy too! thank you! <3
So fun! I will make these with my very precocious six year old niece !
MAGNIFIQUE!!!!!BRAVO!!!!
i was wondering where i can buy an exacto knife.
any suggestions?
Hi Anonymous,
Find an exacto knife at any craft store or, if there's no craft store in your area, any hardware store should carry them as well. Hope that helps. 🙂
Beautiful! And the photos of the ornament are gorgeous… great angles.
Just gorgeous! Lovely idea for those cards you can't bear to recycle.
love this idea and it is adorable but both my daughter and I are stuck on number 6 and can't figure it out.. if you glue any of the pieces together at this point then you end up with 9 half houses in a circle but when I look at yours there are 12 so I'm obviously doing something wrong but can't figure out what??? Help!
Hi Anonymous… You're stuck on number 6? Okay… Whenever you apply glue to any house, try applying it to the same side every time. For example, if you start by putting glue on the left side of your first house, do the same with every other house. That way when you bring groups of houses together, you shouldn't have a problem. I hope this helps. Fingers-crossed! Send me an email if you need more clarification, okay?
Thank you Michele 🙂 I finally figured it out with your help.. yep they are really adorable.. I am thinking of making one and when finished putting the name of all the family members on each half and the year on one.. so that they will always remember who was there that year 🙂
Delightful design 🙂
Greetings,
-Eva Maria
Love this idea for using recycled Christmas ideas… it makes a really attractive and colorful ornament! I put a link to it here:
http://www.craftlinky.com/used-christmas-card-ornaments.html
Oh thanks Noreen. And thank you for linking back! 🙂
This is lovely, thanks for sharing!
wonderful, love it so much.. thankss for inspiration!! ^^
Lindo demais! Obrigada por compartilhar suas idéias maravilhosas!
love this ornament! I have a cricut machine so I can adapt your idea withthe images there, as long as they are identical! I also have a snowflake punch this would be awesome to use it for. Thanks
These are so cute! I have loads of old Christmas cards I just can't bring myself to throw away…this looks like a great way to use them. Thank you! 🙂
Hello, are you able to specify exactly how you make the sides of your template mirror images? Forgive my ignorance, I just don't completely understand that part of the process.
Hi Anonymous,
To get a template that has two identical sides, fold a piece of paper in half and draw only one side of the design on the fold. Now cut out the design while the paper is still folded. Once the design is fully cut out, unfold the paper. That should give you a template with identical sides to start with!
Hope that helps!
My Housewarming gift is now sorted! Thank you
Oh my goodness! What a memory we made this weekend creating these. I've done a dozen of them. Blogged about it here: http://www.jessicaflores.com/my_weblog/2012/12/last-weekends-diy-obsession.html Thank you!!
BEAUTIFUL and Thanks
can u provide a copy of your template?
Beautifully made and designed. Thank you for sharing.
thank you so much, I just have made my first one!
Greetings from Holland
Love this idea and will be making these with my special needs learners in the run up to Christmas. Thanks for sharing.
I love your feelings. I love what came of them. Thank you for sharing.
love this. I hope to start a crafters small group at our church this will be one ornament we will use. I have one question what are the measurements of the house template width x height. when I copied mine over I thought it looked a bit small.
can you make these with any shapes or does it have to be the house and heart?
Any shape you like actually! 🙂