Is there a simpler way to ask it?
Is this nest or is it basket?
‘Tis true that in its heart eggs rest.
So is it basket or is it nest?
It’s made of paper, so you’ve guessed.
I have re-used again, no jest.
Yet I am flustered, I cannot mask it.
Don’t know if this be nest or basket.
I think I may just blow a gasket.
This quest may send me to my casket.
How do I know which name is best?
Nest or basket, basket or nest?
Perhaps it’s best to let it rest,
For this has surely left me stressed.
So I will leave YOU one small task:
That is to name my nest slash basket!
Thank you.
(A silly poem by Michele, March 2011)
Alright, here’s the thing to make the thing…
Tutorial – Basket? Nest?
You will need:
- Empty cereal box
- Yarn ends
- Scissors
- PVA glue (the white stuff)
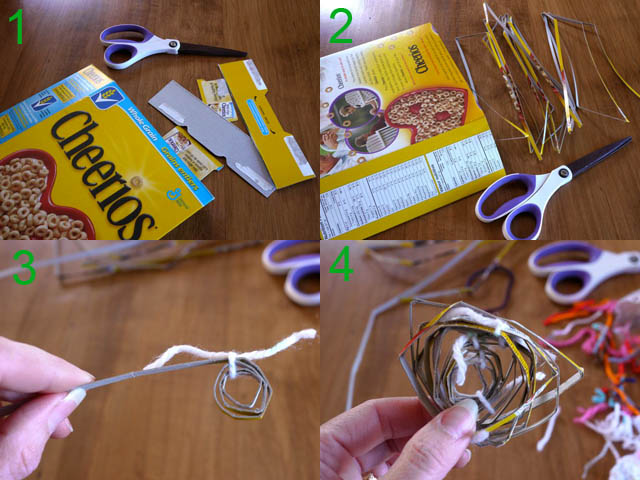
1. Using your scissors, cut off the flaps from both top and bottom of the cereal box.
2. Cut your cereal box around and around creating a continuous piece of cardboard “twine”. One small basket will require you to cut up at least half the box in this way.
3. Begin coiling the cereal box twine around your finger. Tie it with a piece of yarn so it holds its shape.
4. Continue this coiling and tying process until you’ve built a flat disc-like object of the desired diameter. This is the bottom of your basket nest.
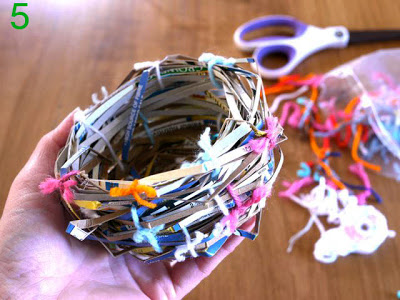
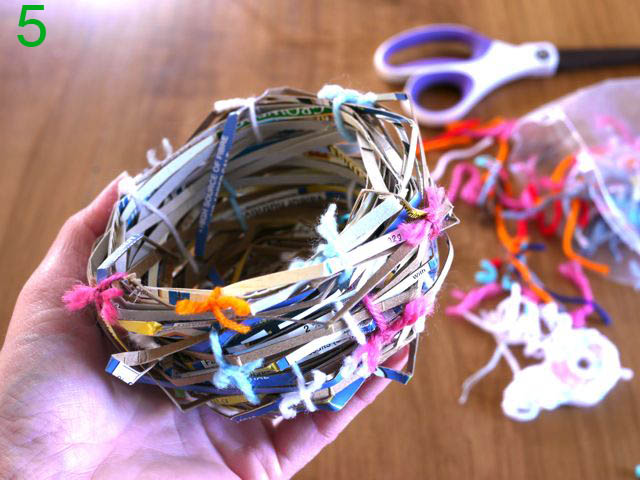
5. Now build the walls of your nest basket by coiling the cereal box twine around the edges of the disc and building up. Continue using little pieces of yarn to hold the walls in place every now and again until you’ve built up the walls to the desired height. Trim the yarn ends or tuck them into the basket nest.

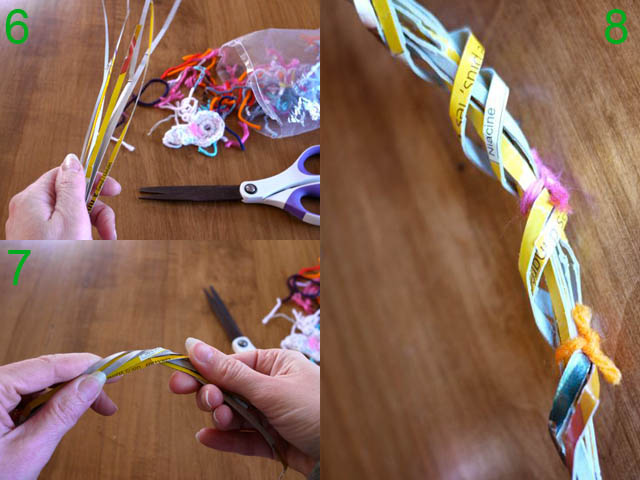
6. The handle will require several lengths of cereal box twine. Make them as long or short as you like. Mine were roughly 16 inches (~40cm) long.
7. Twist the lengths together.
8. To keep the lengths twisted, tie the handle at regular intervals with short pieces of yarn. Trim the yarn ends. Now fasten the ends of your handle to the nest by tying them on with pieces of yarn. Nest basket done. Check.
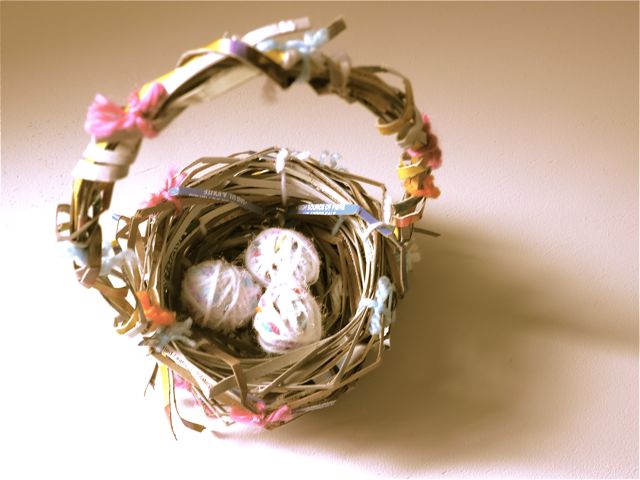
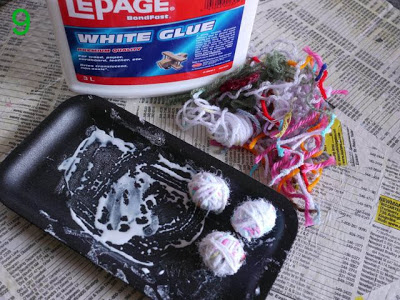
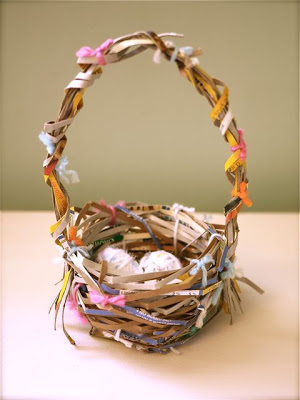
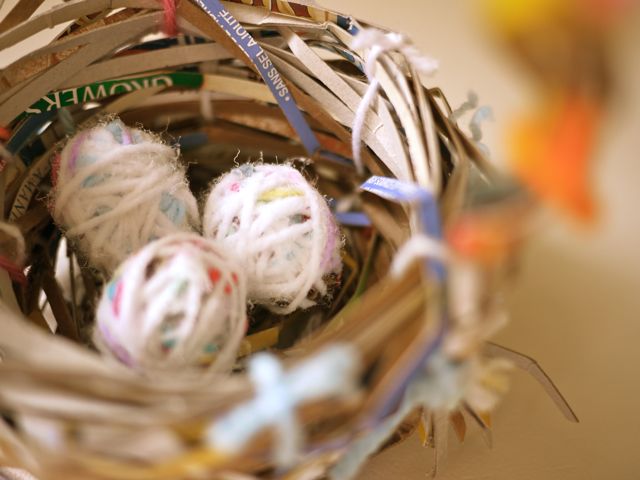
9. Make eggs by balling up some yarn ends and rolling in glue. Let dry. Place in basket. Victory is yours! Your cute “thingie” is complete!

The finished product!

Now have yourself a fabulous day, and I’ll see you again soon!♥M
P.S. Here’s a second little paper Easter basket for you!
Oh this is so creative I love the idea! I love your recycling projects!! Have a great day!
Love the poem and thingie!! Believe I need to make some myself. Thank you for sharing.
Have a God Filled Day
Shirley
Awesome! This is so cute! Thanks for sharing.
Oh I Love this!!!! The yarn eggs are so sweet too. THis is an absolutely wonderful recycled craft (oh, I think it's a nest).
It’s a ’nasket’, that’s for sure!
It’s made of paper, colourful and pure.
I hope it will be made to endure
chocolate eggs, mild and pure!
I LOVE IT !! ♥ I say that a lot about your things… I know ☺ but still I mean it…
That is so brilliant… I wonna do one ☺
Thanks for the tutorial ☺
I like it !
Ahhh, spring!! A nesty basket I would say 🙂
super cute…its a very smart idea..recycling is always nice
p.s Michele,i saw your fine images but i wish you write signatures on your images..plz…
what a very nice idea! Have a nice weekend!
Petra
This is just the perfect thing for the upcoming Easter holidays!!! Love the tutorial and the poem is awesome!
Maybe part of you is bird ??? 😉
It's perfect Michele!
I like this a lot, so much so that I was wondering how many cereal boxes I have in my recycling bin as I was reading about it.
It is a fun little poem, but I think what we have here is definitely a basket of the coiled variety. The nestlike qualities make it charming, but do not alter the purpose.
I love it Michele!!! It's perfect!!
Too beautiful for a name. That's all I have to say about that.
This has to be one of the best things I've ever seen made with cereal boxes. Just lovely.
Adorably brilliant. And I love that it comes complete with poem. Happy weekend Michelle!
Oh, Michele, you are a creative genius.
Hugs
Very cute thingy indeed…for some reason, the fact that it is a Cheerios box makes me extra happy.
Just a quick note to let you know that a link to this post will be placed on CraftCrave today [26 Mar 01:00am GMT]. Thanks, Maria
This is unbelievably adorable, Michele. So clever. And I had a good laugh at your poem, too:)
This is wonderful…I had to go and dig a cereal box out of recycling so I can try it.
SO amazing! I will try this tonight!
I'm doing a month long series on Easter/Spring party tutorials and would love to feature this tutorial on http://www.purejoyeventsblog.com/.
Fabulous!!! I love Easter and this basket is a must have…putting cereals on the shopping list right now.
xxh
My daughter (12 years old) likes your basket very much. I wanna make that basket!! It is só beatifull!!! she said.
I saw this blog post this morning and I had to try it. Here is my first attempt at it. http://textiles4you.blogspot.com/2011/03/cardboard-basket.html Thank you for sharing how you made it.
C'est super comme idée !
Anne
AWW! That is so, so sweet! Thanks for the how-to, I'll be linking.
This is such an awesome idea! I would love to feature it on my blog Reduce, Reuse, Upcycle. Feel free to stop by and grab a featured button. Thanks!
http://reuseandupcycle.blogspot.com
Merci Anne!
I just LOVE this Michele, all too brilliant! Have had some cereal boxes just waiting to be crafted into something so beautiful & festive 🙂
Thanks Christine!
Hey Michelle, I am your newest follower. Gotta say I LOVE you, your blog is awesome, and I love all the recycled projects you do, it's just my thing. Thanks for such wonderful inspiration.
I LOVE this basket, it is brilliant. How in the world can you be so brilliant???
I am featuring this n my facebook page right now, cuz I heart you girl.
Hugs,
Bella 🙂**AMAZE ME AUGUST** @ Bella Before and After
BAH how did I not see this until now??? This is amazing! Whoa. Would love to have one of these sitting out anytime of the year!
thanks Bella and Peaches!
wow~! you are amazing! NOw i won't be able to throw away cereal boxes. you are a genius! Beatiful creation!
Great! thanks
That is seriously adorable! With Joy, Carey
Itz beautiful. Le me try my hand.
I really like this… have wanted something a bit "different" to fill for my older kids, this is perfect. I'm off to create, thanks so much for sharing it!
This a cute idea. One question, how wide did you cut the twine?
Hi Anonymous! I cut the twine slightly less than a 1/4 inch (~5mm) wide to make it easy to work with. Hope this helps!
It's great, and it's even better since it's made from cardboard.
Oh Michele, not only are you a wonderful crafter and artist – but now we find out you are a poet to boot! Bravo, Lisa
Ohhhhhhhhhhhhh!… Tout est beau et original sur ton blog!… J'adore!…
je regarde tout de suite s'il est possible de s"abonner à une newsletter…
Et en plus tu partages ton savoir faire!… Mille mercis…
Très bon week-end